What is a Gas Sensor?
A gas sensor is an electronic device that is used to detect the presence and concentration of specific gases in the air. The most common types of gases that are detected by these sensors include carbon monoxide (CO), hydrogen (H2), methane (CH4), and propane (C3H8).
Gas sensors work by measuring changes in electrical resistance, conductivity, or voltage that are caused by the presence of a target gas. Each type of gas sensor is designed to detect a specific gas, and the output signal of the sensor will vary depending on the concentration of the target gas in the air.
In Arduino projects, gas sensors can be used to monitor indoor air quality, detect gas leaks in homes or buildings, or monitor the levels of specific gases in industrial environments. By connecting the gas sensor to an Arduino board, the output signal from the sensor can be read and used to trigger an alarm or other response in the event of a gas leak or other hazardous situation.
There are many different types of gas sensors available on the market, each with its own strengths and limitations. When selecting a gas sensor for an Arduino project, it is important to consider the type of gas that needs to be detected, the required sensitivity and accuracy, and the operating conditions (such as temperature and humidity) that the sensor will encounter.
What is an MQ6 Gas Sensor?
MQ6 sensor is a sensor having high sensitivity to LPG, propane and isobutane. These sensors can also be used for the detection of different combustible gases, especially methane.
The SnO2 semiconductor material is used in the MQ6 for detecting the gases. It has lower conductivity in clean air. It helps in detecting the rising levels of gases through rise in its conductivity. Users can convert the change of conductivity to gas concentration through a simple electronic circuit.
An MQ6 gas sensor has a wide array of applications such as:
- Domestic and industrial gas leakage detector
- Industrial Combustible gas detector
- Portable gas detector
Applicability of the MQ6 gas sensor is enhanced by the following features:
- High sensitivity to LPG,iso-butane and propane
- Good sensitivity to combustible gases in a wide range
- Fast response time
- Long life
- Low cost
- Simple drive circuit
MQ6 Gas Sensor specifications
- Operating Voltage: 5V
- Operating Current: 150mA
- Operating Temperature: -10 to 50 degree Celsius
- Concentration: 200-10000ppm
MQ6 Gas Sensor pin diagram
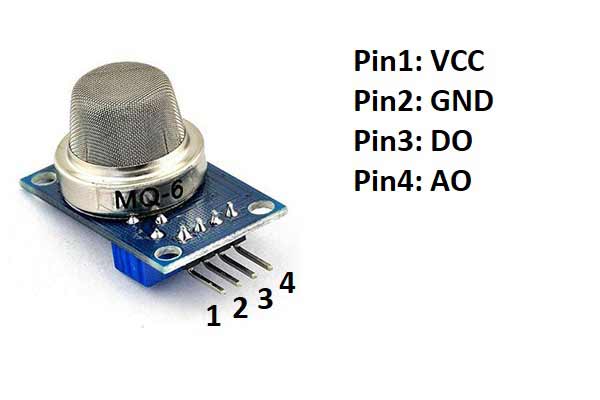
Pin1: It is VCC Pin. It is used to connect 5V to the sensor.
Pin2: It is GND Pin. It is used to connect GND to the sensor.
Pin3: It is a digital output Pin. From this pin, you will get digital data HIGH/LOW.
Pin4: It is analog output Pin. From this pin, you will get analog data.
Circuit diagram of MQ6 Gas Sensor with Arduino
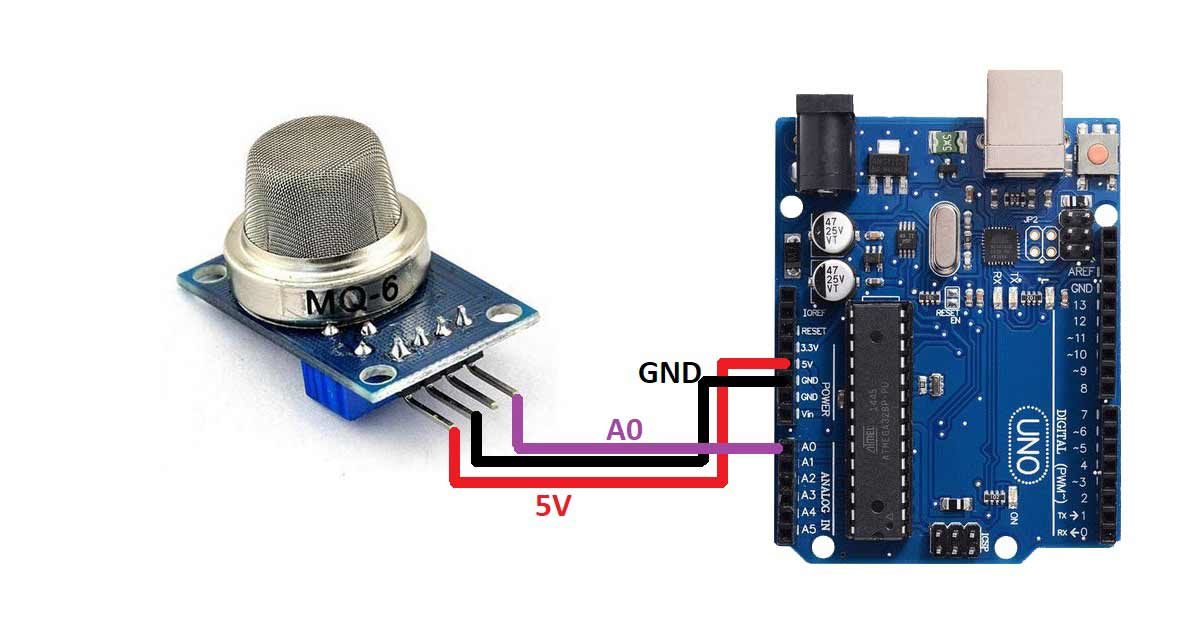
Pin connection of MQ6 Gas Sensor with Arduino
- Connect the VCC pin of the sensor to the 5V pin of the Arduino UNO board
- Connect the GND pin of the sensor to the GND pin of the Arduino UNO board
- Connect the AO pin of the sensor to the A0 pin of the Arduino UNO board
Arduino code for interfacing MQ6 Sensor with Arduino
int sensorPin=A0;
int sensorData;
void setup()
{
  Serial.begin(9600);
  pinMode(sensorPin,INPUT);
 }
void loop()
{
  sensorData = analogRead(sensorPin);
  Serial.print("Sensor Data:");

  delay(100);
}
Arduino code working
int sensorPin=A0;
int sensorData;
Create a variable named sensorPin to the pin number of the Arduino UNO board where you have connected the AO pin of the sensor. In our case, it is A0 pin of the Arduino UNO board.
Create another variable named sensorData. We will use this variable to store the data that will be received by the Arduino from the sensor.
void setup()
{
  Serial.begin(9600);
  pinMode(sensorPin,INPUT);
 }
Inside the void setup block, set the baud rate for the serial communication and initiate the serial communication using Serial.begin() command.
Then use the pinMode() function to set the sensorPin as INPUT. The Arduino will use this pin to get the analog data from the sensor.
void loop()
{
  sensorData = analogRead(sensorPin);
  Serial.print("Sensor Data:");

  delay(100);
}
Inside the void loop() function, use sensorData variable to store the data that is received by the Arduino from the sensor.
Then, print the data on the serial monitor using the print and println command.
Note: The sensor can detect LPG, propane and isobutane. So, the value that you will get from the sensor will depend on the gas that is present.