SG90 Servo: An Overview
The SG90 servo is a small and affordable micro servo motor that is widely used in various DIY projects and hobby robotics applications. This type of servo motor can rotate to a specific angle (usually between 0 and 180 degrees) and hold that position with high accuracy.
SG90 servos have three pins: power, ground, and signal. The power pin is connected to a power source (such as a 5V battery), the ground pin is connected to the ground, and the signal pin is connected to a microcontroller (such as an Arduino board) that sends signals to the servo to control its position.
One of the key advantages of SG90 servos is their small size and lightweight, making them ideal for small robots and other compact projects. They are also relatively simple to interface with microcontrollers and are available at a low cost, making them a popular choice for hobbyists and students.
Pin Diagram of SG90 Servo

The SG90 servo has three pins that are typically labelled as follows:
- VCC (Power Supply)
- GND (Ground)
- Signal (Control)
Here is a brief description of each pin:
-
VCC (Power Supply): This pin is connected to the power supply of the circuit, typically 5V.
-
GND (Ground): This pin is connected to the ground of the circuit.
-
Signal (Control): This pin is used to control the position of the servo motor. A pulse-width modulated signal is applied to this pin, with the width of the pulse determining the position of the motor. The pulse width must be between 600us and 2400us to rotate the motor from 0° to 180°.
Specifications of Reed Switch
- Dimensions: 22 x 11.5 x 28.5 mm (0.87 x 0.45 x 1.12 inches)
- Weight: 9 g (0.32 oz)
- Operating voltage: 4.8 V to 6 V
- Stall torque: 1.6 kg/cm (22.2 oz/in) at 4.8 V
- Operating speed: 0.12 sec/60° at 4.8 V
- Temperature range: 0°C to 55°C (32°F to 131°F)
- Dead band width: 10 µs
- Rotation angle: Approximately 180° (can be modified by changing the servo horn)
- Connector wire length: Approximately 300 mm (11.8 inches)
- Control signal: Pulse width modulation (PWM)
Note: The specifications listed above may vary slightly based on the manufacturer and specific model of the SG90 servo. These are typical specifications for a standard SG90 servo.
Interfacing SG90 servo with Arduino
Materials needed:
- SG90 servo
- Arduino board (such as Arduino Uno)
- Breadboard
- Jumper wires
Circuit Diagram of Interfacing SG90 servo with Arduino
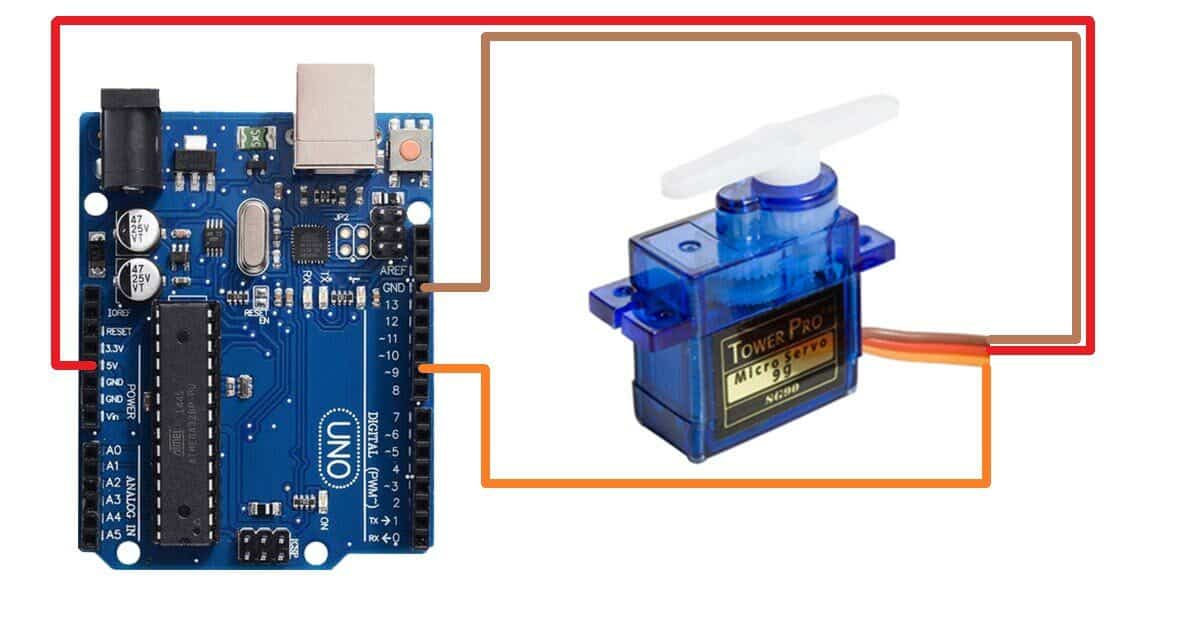
Step 1: Connect the Servo to the Breadboard
Take the SG90 servo and place it onto the breadboard. The servo has three pins: power, ground, and signal.
- Connect the power pin to the 5V pin on the Arduino
- Connect the ground pin to one of the GND pins on the Arduino
- Connect the signal pin to a digital pin on the Arduino
Step 2: Install the Servo Library
The Arduino Servo library makes it easier to control a servo motor with the Arduino board. To install it, open the Arduino IDE, go to Sketch > Include Library > Servo, and select the Servo library.
Step 3: Write the Code
Once the library has been installed, it’s time to write the code. Here is an example code that will make the servo motor rotate from 0 to 180 degrees and back to 0 again:
Arduino Code for Interfacing SG90 Servo With Arduino Board
#include <Servo.h>
Servo myservo;

void setup() {
  myservo.attach(9); // Attach the servo to pin 9
}

void loop() {
  for (int i = 0; i <= 180; i++) { // Rotate the servo from 0 to 180 degrees
    myservo.write(i);
    delay(15);
  }
  for (int i = 180; i >= 0; i--) { // Rotate the servo back to 0 degrees
    myservo.write(i);
    delay(15);
  }
}
Step 4: Upload the Code
Once the code has been written, connect the Arduino board to your computer using a USB cable and upload the code to the board. The servo should start rotating from 0 to 180 degrees and back to 0 again, repeating this process indefinitely.
And that’s it! By following these simple steps, you should be able to interface an SG90 servo with an Arduino board in no time. Happy tinkering!