What is Arduino?
Arduino is an open-source electronics platform that allows you to create interactive and programmable electronic projects. The platform consists of hardware and software components, with the hardware comprising microcontroller boards, and the software consisting of an Integrated Development Environment (IDE) used to program the boards.
The Arduino platform was created to provide an easy-to-use and low-cost way for people to learn about electronics and programming. The platform is highly accessible and has a large community of users and developers who contribute to its development and improvement.
The Arduino platform is designed to be highly versatile and can be used for a wide range of projects, from simple LED blinking projects to more complex robotics projects. Arduino boards come in different sizes and with varying specifications, allowing users to choose the board that best suits their project’s needs.
The heart of the Arduino platform is the microcontroller board. The board is a small computer that can be programmed to control various electronic components such as motors, sensors, and displays. The most popular Arduino board is the Arduino UNO, which is based on the ATmega328P microcontroller.
The Arduino IDE is a software application used to program microcontroller boards. The IDE is open-source and runs on Windows, macOS, and Linux. It has a simple and user-friendly interface that makes it easy for beginners to get started with programming Arduino boards.
Arduino boards are programmed using a language that is based on C and C++. The language is simplified to make it easy for beginners to learn and understand. The IDE includes a code editor, a compiler, and a serial monitor that allows you to communicate with the microcontroller board.
One of the biggest advantages of the Arduino platform is the large community of users and developers who contribute to its development. The community has created a vast library of code and projects that can be used to build your own projects. The community also provides support and resources for users who need help with their projects.
The Arduino platform has become popular in education and maker communities worldwide. It provides an easy and accessible way for people to learn about electronics and programming. The platform is used in schools, universities, and workshops to teach students about electronics, robotics, and programming.
Arduino UNO Board
About Arduino UNO Board
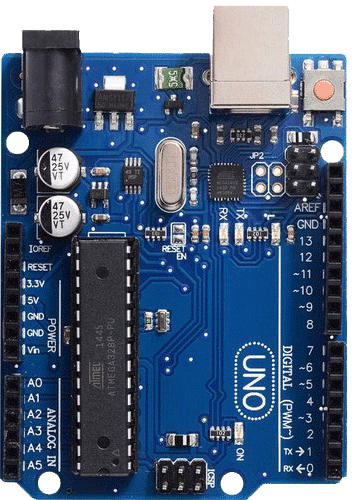
One of the most popular Arduino boards is the Arduino UNO. The Arduino UNO is a microcontroller board based on the ATmega328P microcontroller. It has 14 digital input/output pins (of which 6 can be used as PWM outputs), 6 analog inputs, a 16 MHz quartz crystal, a USB connection, a power jack, and a reset button.
One of the significant advantages of the Arduino UNO is its simplicity. It’s very easy to get started with the board, even if you don’t have any experience with electronics or programming. The board comes with a preloaded program called the bootloader, which allows you to upload new code to the board using the Arduino IDE via USB.
The Arduino UNO is also very versatile. It can be used to control a wide range of electronic components, such as LEDs, motors, sensors, and displays. With the help of the Arduino IDE, you can easily write programs to control these components and create your own electronic projects.
Another significant advantage of the Arduino UNO is its size. The board is very compact, measuring only 2.7 inches by 2.1 inches. This makes it easy to integrate the board into your projects without taking up too much space.
Board configuration of Arduino UNO Board
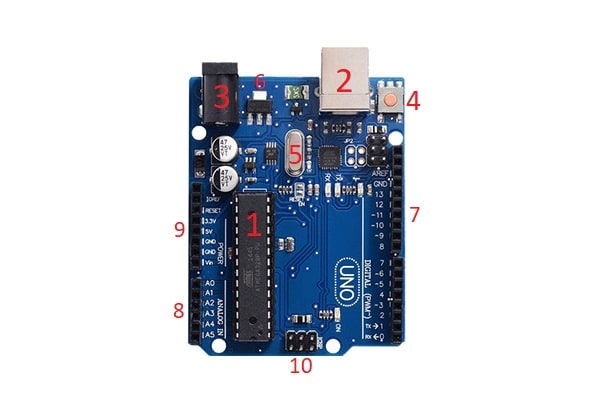
The Arduino UNO is a microcontroller board that is based on the ATmega328P microcontroller. It has a number of pins that are used for input and output, including digital pins, analog pins, and power pins. In this section, we will look at the board configuration of the Arduino UNO.
The Arduino UNO board has the following components:
-
ATmega328P microcontroller: This is the main component of the board, and it is responsible for running the code that is uploaded to the board.
-
USB port: This port is used to connect the board to a computer for programming.
-
Power jack: This jack is used to connect an external power source to the board.
-
Reset button: This button is used to reset the board.
-
Crystal oscillator: This component provides the clock signal that the microcontroller uses to synchronize its operations.
-
Voltage regulator: This component regulates the voltage that is supplied to the board.
-
Digital pins: The Arduino UNO has 14 digital input/output pins, labelled from 0 to 13. These pins can be used to connect to digital components such as LEDs, motors, and switches.
-
Analog pins: The board has 6 analog input pins, labelled A0 to A5. These pins can be used to read analog signals from sensors and other components.
-
Power pins: The board has 5 power pins, including 3.3V, 5V, GND, Vin, and RESET.
-
ICSP header: This header is used to connect the board to a programmer for advanced programming and debugging.
The pins on the Arduino UNO board can be configured for different modes, including input, output, and PWM (Pulse Width Modulation) output. The pins can also be configured to work with different voltages, including 3.3V and 5V.
Arduino UNO Board Pin Configuration
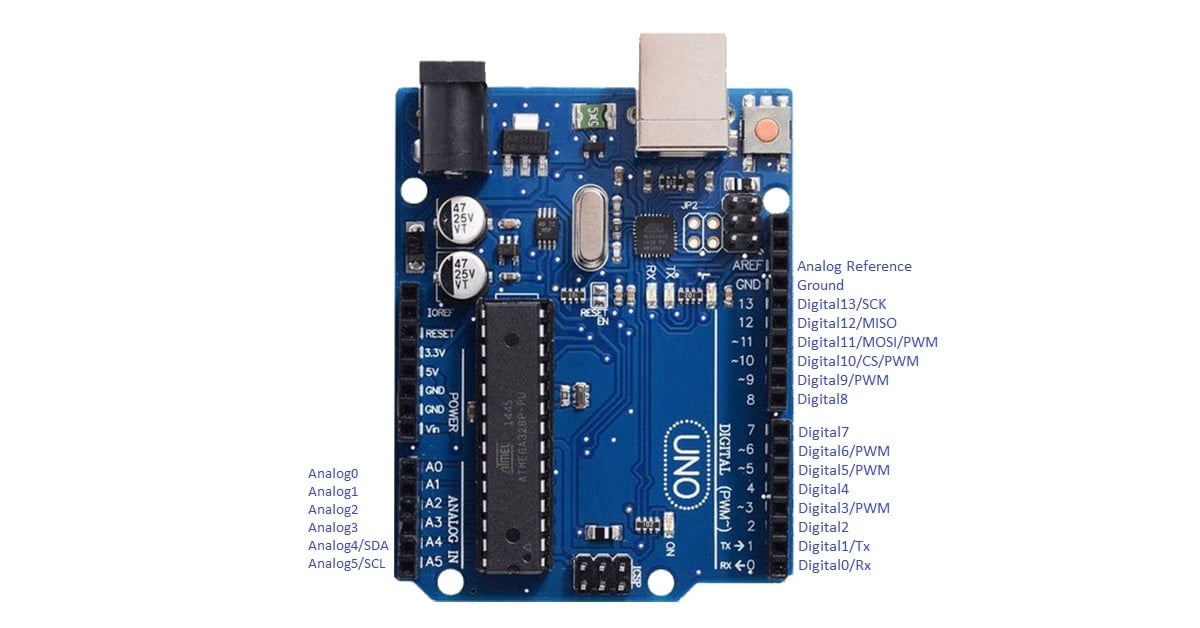
It has a number of pins that can be used for input and output, including digital pins, analog pins, and power pins. In this section, we will look at the pin configuration of the Arduino UNO board.
-
Digital Pins: The Arduino UNO board has 14 digital pins labelled 0 to 13. These pins can be used for digital input or output. The digital pins can be set to either HIGH or LOW states, which means 5V or 0V respectively.
-
Analog Pins: The board has 6 analog pins labelled A0 to A5. These pins can be used to read analog signals from sensors and other components. The analog pins can read a voltage range from 0 to 5V.
-
Power Pins: The board has 5 power pins:
a. 5V: This pin provides a 5V power supply to the board.
b. 3.3V: This pin provides a 3.3V power supply to the board.
c. Vin: This pin provides power to the board from an external power source.
d. GND: This pin is used as the ground for the board.
e. RESET: This pin is used to reset the board.
-
PWM Pins: Some of the digital pins on the Arduino UNO board can be used for PWM (Pulse Width Modulation) output. These pins are labelled as 3, 5, 6, 9, 10, and 11. The PWM pins can be used to control the brightness of LEDs, the speed of motors, and other similar applications.
-
I2C Pins: The board has two pins labelled SDA(A4) and SCL(A5), which can be used for I2C communication with other devices.
-
SPI Pins: The board has three pins labelled MISO(12), MOSI(11), and SCK(13), which can be used for SPI communication with other devices.
- Tx & Rx Pins: The Tx and Rx pins on the Arduino UNO board are used for serial communication with other devices. The Tx pin is used to transmit data, while the Rx pin is used to receive data.