What is a water sensor?
It is a type of sensor that is used to detect the presence of water or to detect water leakage. It can be of many different types and some of these are conductive, optical, vibrating, ultrasonic, float, etc. Here we will be discussing a conductive or a resistive type water sensor.
In a resistive type water sensor, the circuit of the water sensor is designed in such a way that when the sensor comes in contact with the water the resistance of the water sensor decreases and the conductivity of the sensor increases, and vice-versa. Then, it outputs a voltage depending on the conductivity of the sensor. Further, we can measure this conductivity in terms of voltage using any microcontroller. Here, we are using an Arduino UNO board.
Applications of the water sensor module
- River water leveling device
- Dam construction
- Water tank monitoring systems
- Nuclear power plants
- Automobiles
Pin configuration of the water sensor module
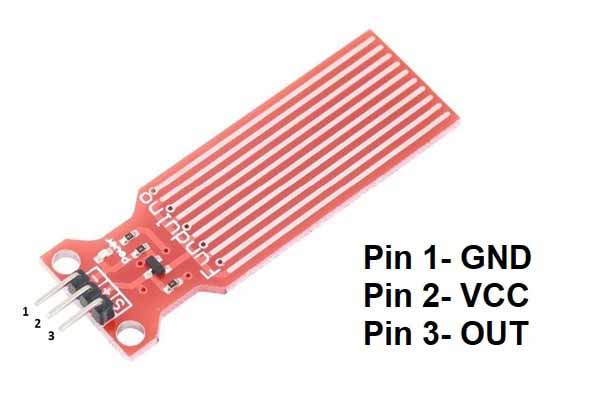
Pin uses of water sensor module
- GND pin of the sensor is used for connecting to GND.
- VCC pin of the sensor is used for connecting to 5V.
- OUT pin of the sensor is used for getting signal from the sensor.
Features of the water sensor module
- The operating voltage is 5 volts.
- The operating current is <20mA.
- It is a highly sensitive and low power consumption sensor.
- It outputs analog data in form of volts.
Components needed
- Arduino UNO
- Water sensor
- Jumper wires
- Breadboard
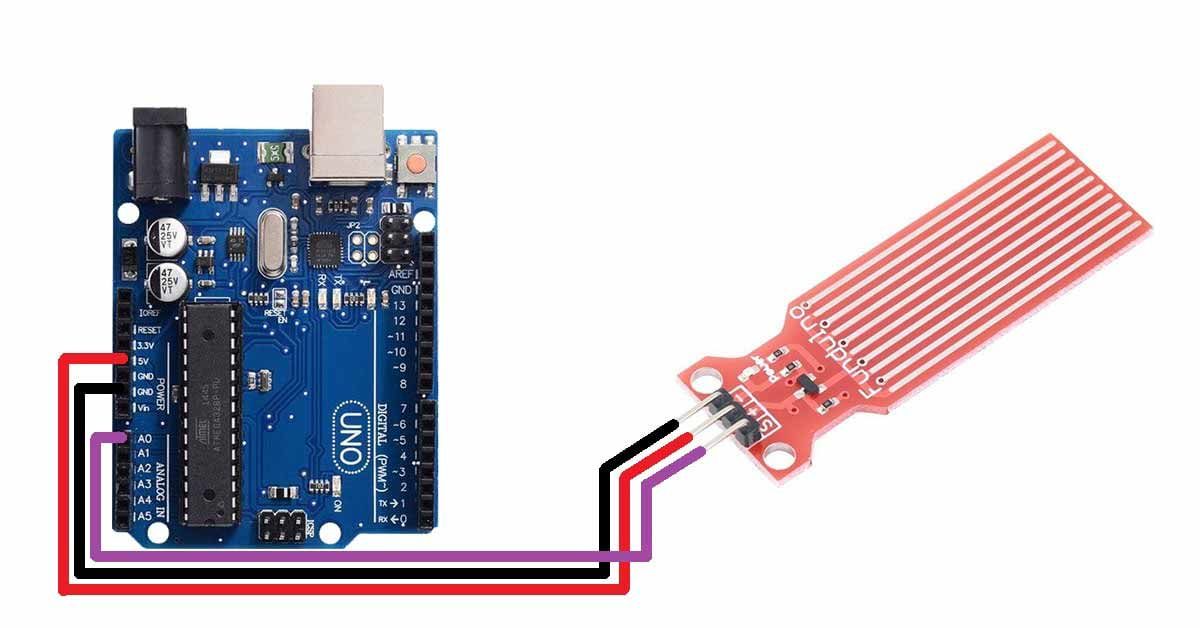
Pin connections of the water sensor module with Arduino UNO
- Connect the VCC pin of the sensor to the 5v pin of the Arduino UNO.
- Connect the GND pin of the sensor to the GND pin of the Arduino UNO.
- Connect the OUT pin of the sensor to the A0 pin of the Arduino UNO
Circuit diagram of a water sensor module with Arduino UNO
Arduino code for a water sensor
const int waterSensor=A0;// define a pin for OUT pin of sensor
void setup() {
  Serial.begin(9600);// set baud rate for serial communication
}

void loop() {
  int waterSensorData=digitalRead(waterSensor);// read sensor data using digitalRead() function
  Serial.print("SENSOR DATA:");
  Serial.println(waterSensorData);// print the data on the serial monitor
  delay(100);
}
Water sensor module Arduino code working
const int waterSensor=A0;First, create a variable to the pin number where you want to connect the OUT pin of the sensor. You can use any analog pin(A0-A5).
void setup() {
  Serial.begin(9600);// set baud rate for serial communication
}
In the setup() function, initiate serial communication and set the baud rate to 9600 using Serial.begin(9600); command. We have to do so, so that we can see the values that are coming from the sensor.
void loop() {
  int waterSensorData=digitalRead(waterSensor);// read sensor data using digitalRead() function
  Serial.print("SENSOR DATA:");
  Serial.println(waterSensorData);// print the data on the serial monitor
  delay(100);
}
In the void loop() function, first create a variable to store the data that is coming from the sensor. You can give any name to it, I have given waterSensorData to it. You have to use analogRead() function for this.
Then using Serial.print and Serial.println command, print the sensor data on the serial monitor.
After that, give a delay of 100ms, so that you Arduino receive values from the sensor after every 100ms.