What is a Solenoid Door lock? How does a solenoid door lock work?
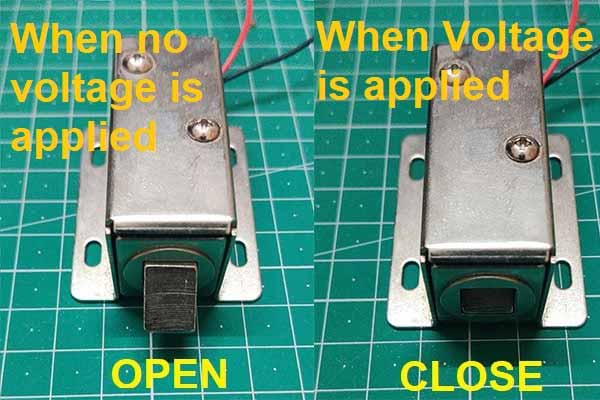
It is a type of door lock that is based on electromagnetism. It has two components, one that produces a magnetic field(a coil) and another is the moveable armature. When you apply a voltage to the solenoid coil, the armature moves outside the coil and when you do not apply any voltage to the solenoid coil, the armature comes back inside. See figure 1. The solenoid door lock that we gonna use here, works on 12 volts, and Arduino UNO is not capable of providing 12 volts. So, in order to give power to the door lock, we will use a 5-volt relay module. We will connect the inputs of the relay module to the Arduino UNO and OUTPUT of the relay module to the solenoid door lock. Also, we have to connect a 12-volt power supply to the relay module in order to give power to the lock.
Working of the Solenoid Door Lock
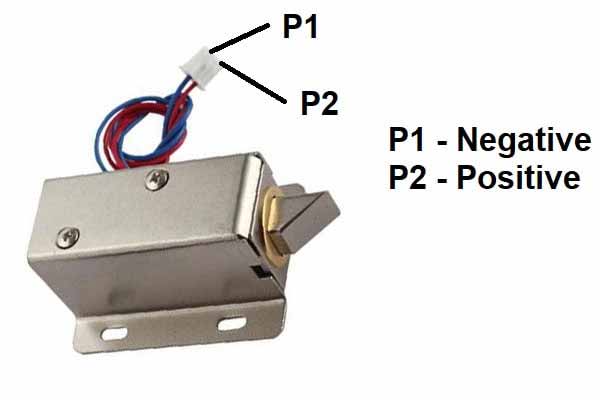
Pin configuration of the Solenoid Door Lock
Features of the solenoid door lock
- The operating voltage is between 9-12 volts DC.
- The operating current is 900mA at 12v and 750mA at 9v.
- It has a long activation time of 1-12s.
- It is rustproof, durable, safe, convenient to use.
Components needed
- Arduino UNO
- One 5-volt relay module
- 12-volt adapter of battery
- Two pushbuttons
- Wires
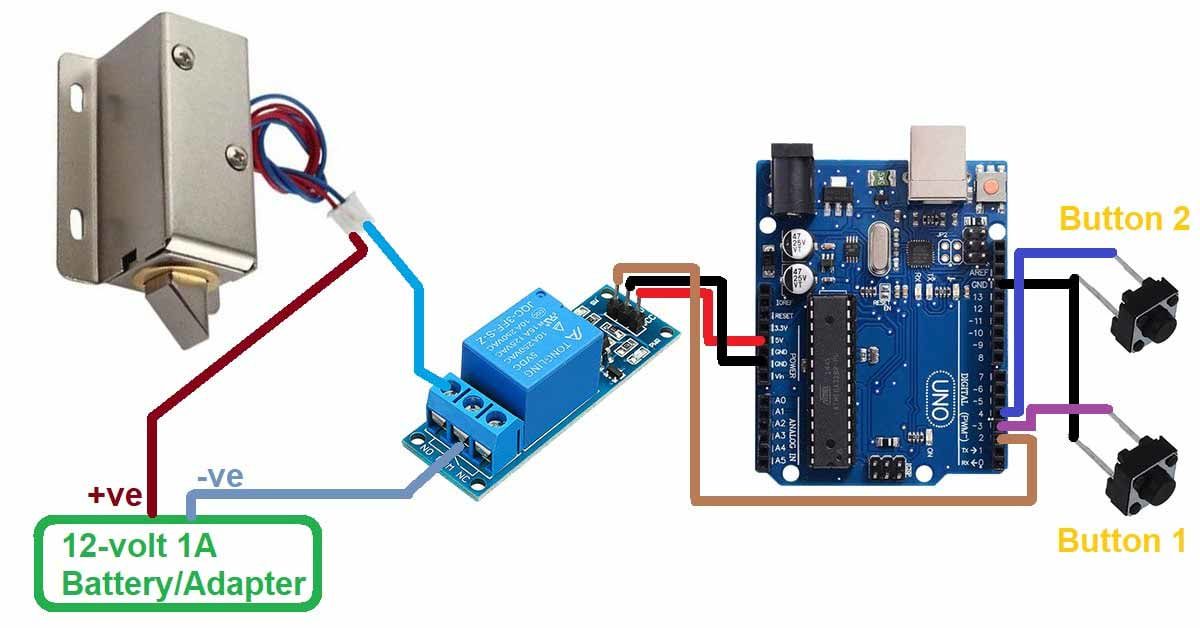
Pin connections of the solenoid door lock with Arduino UNO
- Connect the VCC pin of the relay module to the 5v pin of the Arduino UNO.
- Connect the GND pin of the relay module to the GND pin of the Arduino UNO.
- Connect the IN pin of the relay module to the D2 pin of the Arduino UNO.
- Connect the positive wire of the lock to the positive wire of the battery.
- Connect the negative wire of the lock to the NO terminal of the relay module.
- Connect the negative wire of the battery to the COM pin of the relay module.
- Connect one terminal of the 1st pushbutton to the GND pin of the Arduino UNO.
- Connect one terminal of the 2nd pushbutton to the GND pin of the Arduino UNO.
- Connect another end of the 1st pushbutton to the D3 pin of the Arduino UNO.
- Connect another end of the 2nd pushbutton to the D4 pin of the Arduino UNO.
Circuit diagram of the Solenoid Door Lock
Arduino code for Solenoid Door Lock
int relay=2;
int button1=3;
int button2=4;
void setup() {
pinMode(relay,OUTPUT);
pinMode(button1,INPUT_PULLUP);
pinMode(button2,INPUT_PULLUP);
}

void loop() {
int button1Data=digitalRead(button1);
int button2Data=digitalRead(button2);
if(button1Data==LOW)
{
digitalWrite(relay,LOW);
}
if(button2Data==LOW)
{
digitalWrite(relay,HIGH);
}
}