About this project
In this tutorial, you will learn how to control home appliances like a light bulb, CFLs, fan, ACs, etc. with a TV remote or any other IR-based remote.
Working of this project
We will connect all the appliances to the Arduino UNO board with the help of a relay module. We are not directly connecting the appliances because all the appliances work on AC voltage and Arduino can’t handle AC voltages. The Arduino UNO board can only provide a maximum of 5VDC.
The Arduino UNO board will send a signal to turn ON and OFF the relay module and relay module then turn ON and OFF the appliances.
Arduino UNO board will send a signal to the relay module based on the button pressed on the TV/IR remote. To check which button is pressed on the TV/IR remote will use an IR receiver sensor TSOP1738 to receive the data from the TV/IR remote. Based on the received data. we can find out which button is pressed.
Then we will assign buttons to each of the appliances. Then Arduino UNO board will check, which button is pressed and it will turn on the respective appliance.
If you want to learn about TSOP1738. Click here.
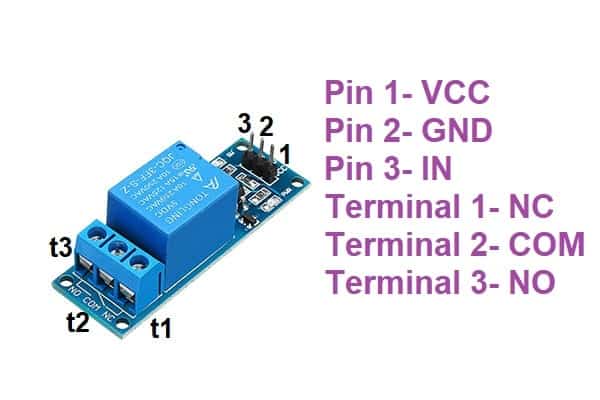
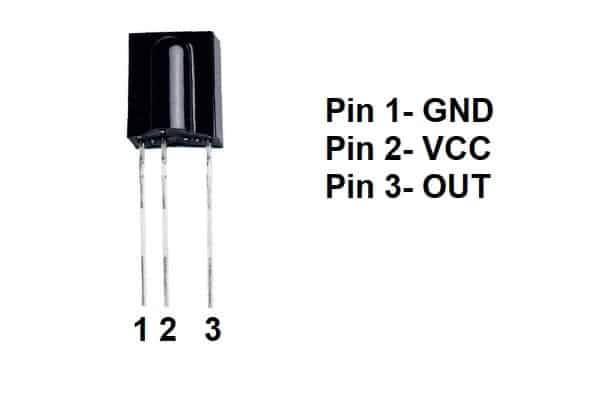
Pin diagram of relay module and TSOP1738
Components needed for this project
- Arduino UNO
- Relay Module
- TSOP1738
- TV/IR remote
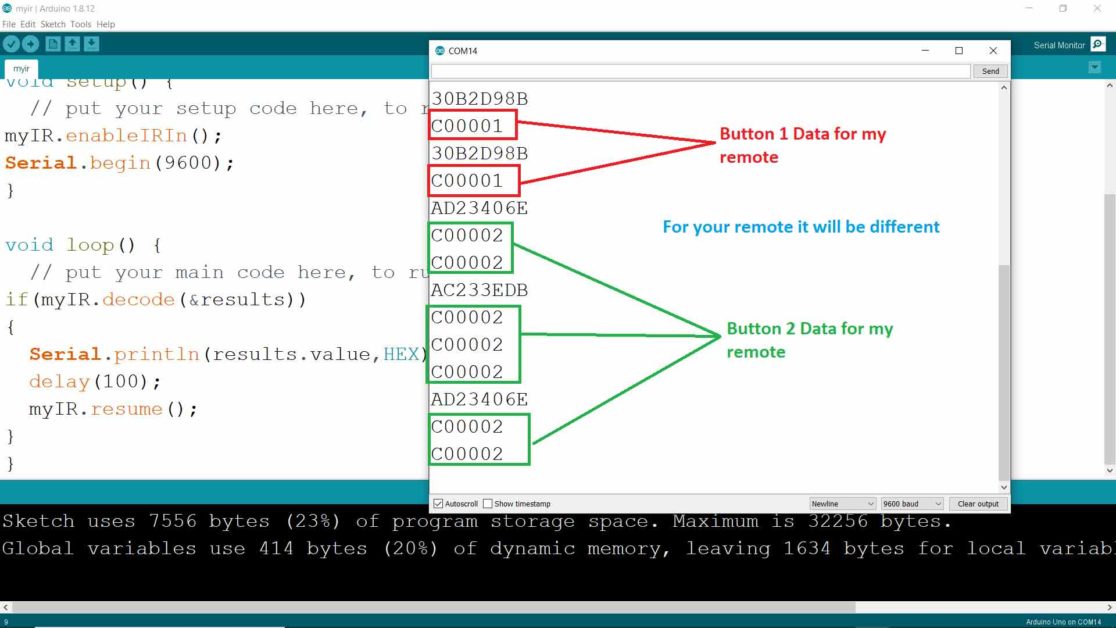
First, we have to find out what data is sent by the remote when any of the buttons are pressed on the remote. Each button of the remote sends different data. Suppose, you are controlling one appliance with the TV remote then we will choose two buttons of the remote one for turning ON the appliance and the other for turning OFF the appliance. Let’s assume we have chosen button 1 and button 2.
Now, upload this code to your Arduino UNO board and connect the TSOP1738 as shown in the circuit diagram. Before uploading the code to the Arduino board download and install a library for the TSOP1738 sensor from here.
My TV remote.


#include<IRremote.h>
int recvPin=3;
IRrecv myIR(recvPin);
decode_results results;

void setup() {
  // put your setup code here, to run once:
myIR.enableIRIn();
Serial.begin(9600);
}

void loop() {
  // put your main code here, to run repeatedly:
if(myIR.decode(&results))
{
  Serial.println(results.value,HEX);
  delay(100);
  myIR.resume();
}

}
After you have uploaded the code to the Arduino UNO board, open the serial monitor and start pressing the button.
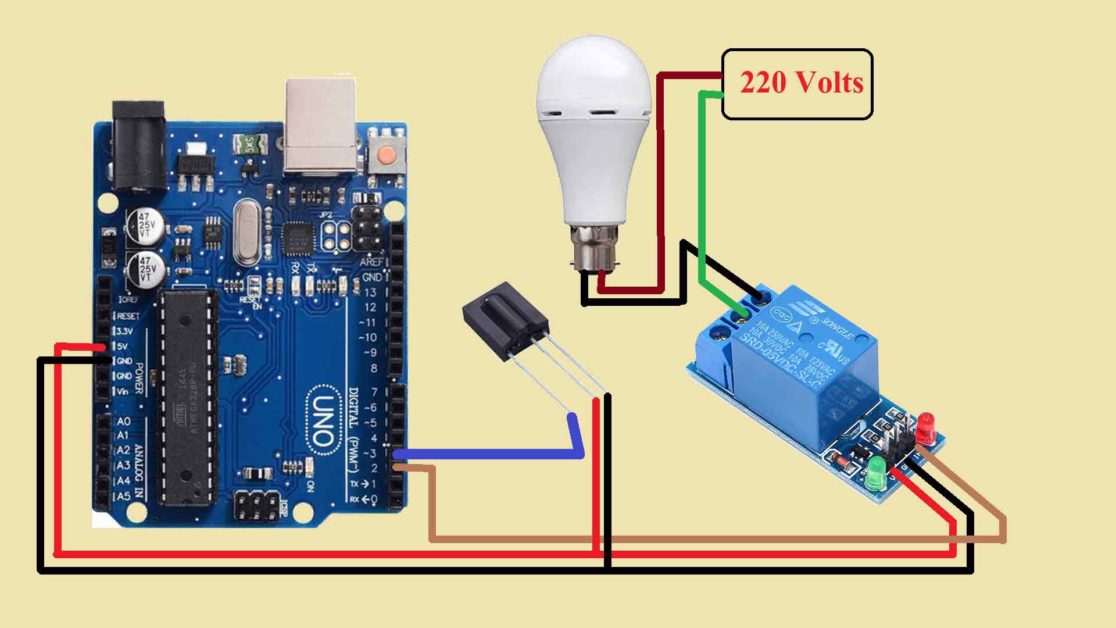
Now, we know what data is sent by which button. Upload the below code in the Arduino UNO board and connect your home appliance as shown in the figure.
Warning: The circuit used in this tutorial uses mains voltage. Mishandling of such a high voltage can lead to major injuries. We are not responsible for any damage. Proceed only if you have prior experience in working with the mains voltage.
Arduino code for Home Automation
#include<IRremote.h>
int IRpin=3;
int relay=2;
IRrecv myIR(IRpin);
decode_results results;

void setup() {

myIR.enableIRIn();
pinMode(relay,OUTPUT);
Serial.begin(9600);
digitalWrite(relay,HIGH);
}

void loop() {
  // put your main code here, to run repeatedly:
if(myIR.decode(&results))
{
  Serial.println(results.value,HEX);
  delay(100);
  if(results.value==0xC00001)
  {
    digitalWrite(relay,LOW);
  }
  if(results.value==0xC00002)
  {
    digitalWrite(relay,HIGH);
  }
  myIR.resume();
}
}
Circuit diagram of Home Automation with Arduino
Working of main code
#include<IRremote.h>Include library for IR remote in your code. Before using the library in your code, you must have installed this library in the Arduino IDE libraries folder. Download the library from here.
int IRpin=3;
int relay=2;
Create one variable for the TSOP1738 data pin and one for signal pin of the relay module.
IRrecv myIR(IRpin);
decode_results results;
In the first line, I have created an object named myIR and passed the TSOP1738 data pin as a parameter. We will access all the functions of the library using this object.
In the second line, I have created another variable named results of type decode_results. We will use this variable to store the data received by the Arduino UNO board from the TV/IR remote.
void setup() {

myIR.enableIRIn();
pinMode(relay,OUTPUT);
Serial.begin(9600);
digitalWrite(relay,HIGH);
}
In the void setup() function, enable the IR transmission using enableIRIn function. Then set the relay pin as OUTPUT. Also, initiate the serial communication with the 9600 baud rate.
In the last, set the relay pin as HIGH. You have to do so because the relay module is turned ON when you give Logic LOW to it. So, to initially turn it OFF we are setting the signal pin of the relay module as HIGH.
void loop() {
  // put your main code here, to run repeatedly:
if(myIR.decode(&results))
{
  Serial.println(results.value,HEX);
  delay(100);
In the void loop() function first, we will check whether the data is received by the Arduino from the TV/IR remote or not using the “If” statement. If the “If statement” is true then we will print the received data in HEX form on the serial monitor.
if(results.value==0xC00001)
  {
    digitalWrite(relay,LOW);
  }
Using another ‘If’ statement, we will check whether the received data is equal to the data of the first button or not. It is equal then Arduino will turn on the appliance by sending Logic LOW to the relay module. Remember you have to write ‘0x’ before your remote button data. For example, my button 1 data is C00001 but I have to write 0xC00001 in the “If statement”.
if(results.value==0xC00002)
  {
    digitalWrite(relay,HIGH);
  }
Similarly, I have check the data for the button 2. If the received data matches with the data of the button 2 then the Arduino will send Logic HIGH to the relay module. The appliance connected to that relay module will be turned OFF.
myIR.resume();
}
}
In the last, resume the IR transmission using resume() function, so that TSOP1738 sensor continuously receive data from the remote.
Close all the curly brackets.